


Product Description
C8 Corvette O6G-Ultra Strut Tower Covers
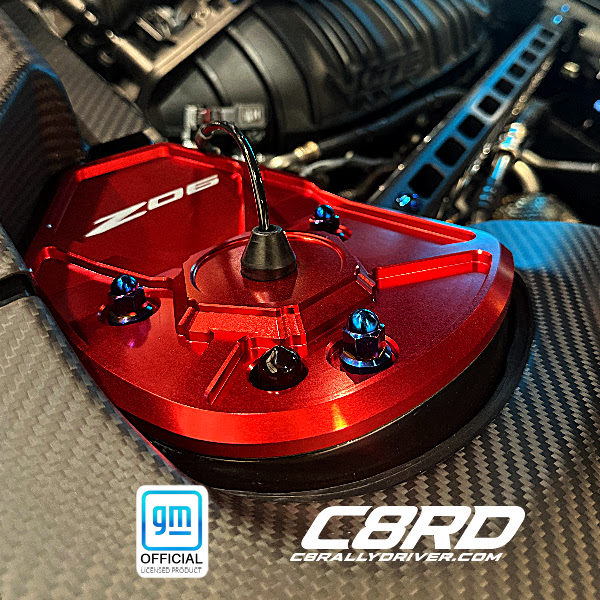
The Chevrolet C8 Corvette O6G-Ultra Strut Tower Covers by C8RallyDriver Designs is a GM Officially Licensed Corvette accessory. This is premium product for the hardcore C8 Corvette enthusiast. Presented as a boxed set, the O6G-Ultra Strut Covers feature precision CNC engraved Corvette logos. C8 Corvette logo options include the popular Corvette Official Flags, Stingray, Z51, Z06, ZR1, ERay, Jake C8.R and 70th anniversary edition.
Available in anodized red, black and blue color options, this accessory adds color and style to a highly visible area in the engine bay of all 2020+ C8 Corvette Coupes. The stock factory strut towers are highly visible structural supports for the rear strut/shocks and lack visual appeal. The C8RD design team has once again jumped in to create a visually appealing premium product that every C8 Corvette deserves. The O6G-Ultra Strut Covers bolt to the top of the factory strut towers without any modification.
The O6G-Ultra Strut Tower Covers are custom CNC machined from high grade 6061 billet aluminum. Product design and dimensions allow for factory fitment. No modifications are required for installation and all mounting hardware is included. Options include upgraded burnt blue or clear anodized titanium acorn nuts if the black mounting hardware isn't flashy enough for you.
Related products include the full line of C8RallyDriver Designs engine bay accessories with matching billet, carbon fiber and more to take your engine bay to the Ultra and beyond.
The C8 Corvette O6G-Ultra Strut Tower Covers by C8RallyDriver Designs is a GM Officially licensed Corvette accessory. GM Trademarks used under license to C8RallyDriver.
Included
Boxed presentation set of two C8 Corvette O6G-Ultra Strut Tower Covers, 6 titanium acorn nuts, 6 Nylon washers, 6 rubber spacers, 2 silicone rubber caps.
Fitment
This product will fit all 2020+ Corvette C8 Coupes - Stingray, Z51, Z06, ERay, Grand Sport, Grand Sport X, ZR1 and ZR1X. Does NOT fit the C8 HTC model.
Anodized Finish
While we use the highest quality dyes and anodizing processes, all anodized parts are susceptible to color fade from exposure to UV light, heat and cleaners over time. To maintain the vibrant color of your anodized parts as long as possible, minimize long term direct sunlight exposure with garage storage, car covers and coating the products with a UV inhibiting SiO2 and graphene ceramic spray coating after washing and on a regular detailing cycle. This will also help keep the product clean and avoid mineral deposits and water spots. Do not use chemical or acid based cleaners on anodized parts.
Installation
Install video is located HERE.
Detach mag ride cable and slide the rubber cap grommet up the cable (Skip this step if car does not have mag ride). Install the 3 rubber spacers on each strut tower on top of the existing shock tower nuts. DO NOT REMOVE the factory installed shock tower nuts - these will remain in place. Install the silicone rubber caps on the strut/shock locating pin (That's the silver metal pointy thing sticking up through the strut tower. These will prevent scratches to the strut tower covers during install, but if you like the black look these can remain in place after installation is complete.
Now it's time to install the covers. Note there are three holes for mounting the covers and the hole on the flat side of each cover has a notch cut into it. Note the cover orientation is the flat side faces the front of the car. Start by placing the notched hole first and then angle the cover downward toward the logo next. Finish by pivoting the cover towards the back of the car over the two remaining holes. Go slowly and methodical to avoid scratching the anodizing finish on the bolts. Next, place a nylon washer over each of the 3 bolts. Ensure that the cover is centered and check that the bolts are centered in the strut cover holes. Install the three titanium washers hand tight, rotating to each in succession until fully hand tightened. Check once more for centering and if everything looks straight, use a deep 12mm socket to tighten the acorn nuts.
IMPORTANT INSTALLATION WARNING: There is zero reason to tighten the acorn nuts down with an impact driver or power driver/ratchet. The acorn nuts should be tightened using a ratchet/socket wrench until there is good resistance. This is about 2-3 turns of the ratchet after hand tightening is completed. Over tightening can potentially damage the cover.


